
Corner Base Cabinet Dimensions Vary by Type
A blind cabinet with a 36-inch physical box may require a longer section of wall once its positioning and access requirements are included.
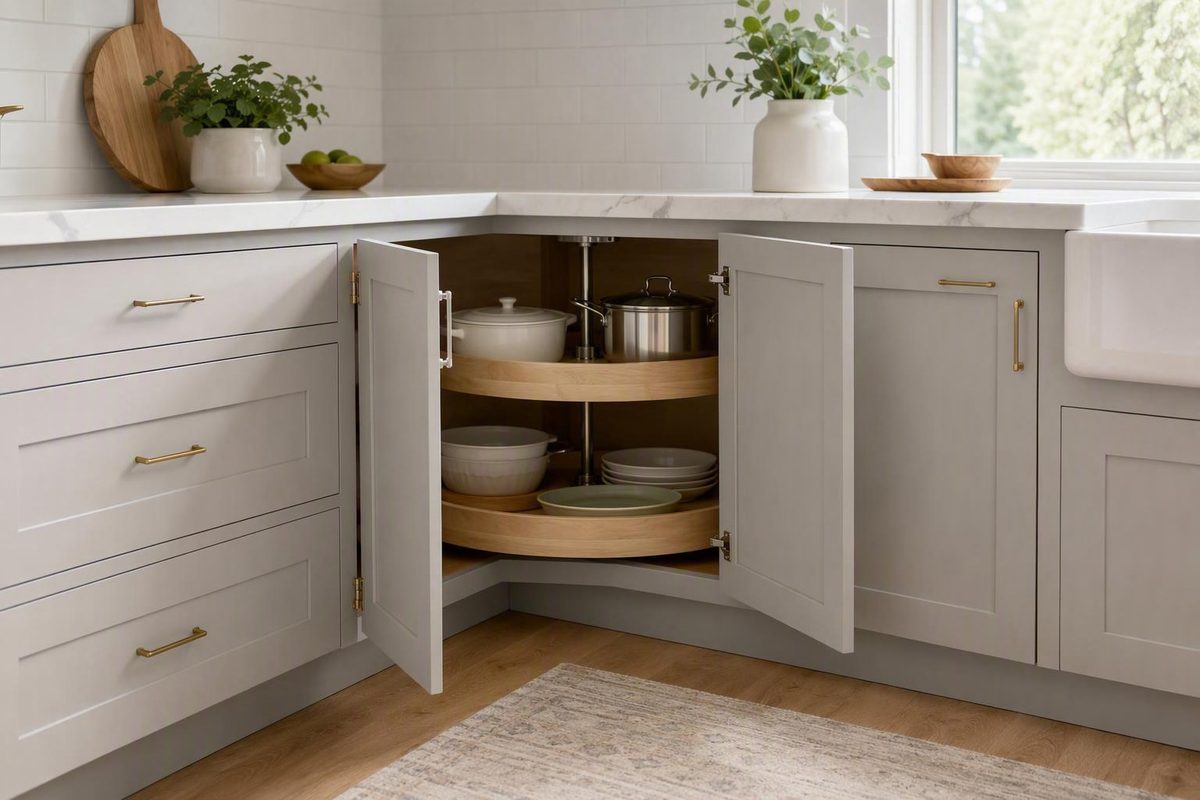
A kitchen corner cabinet does not have one universal size. Its dimensions and installed footprint depend on the cabinet type, product line, hardware, door configuration, adjacent cabinets, and room conditions.
The first planning question is therefore not “Do I need a 36-inch cabinet?” It is “Which type of corner cabinet am I using?” A 36-inch Lazy Susan, a 36-inch blind-corner cabinet, and a 36-inch diagonal cabinet can occupy the corner in substantially different ways.
Many conventional corner bases are approximately 34.5 inches high before the countertop and 24 inches deep. A typical 1.5-inch countertop brings a 34.5-inch cabinet to an approximately 36-inch finished work-surface height. These are common conventions rather than mandatory dimensions, and product-specific exceptions exist in VanityArt’s overview of kitchen cabinet dimensions.
The final plan must distinguish the cabinet’s nominal name from its actual box, wall-leg occupancy, working length, door width, and complete installed footprint. It must then account for fillers, panels, door and organizer movement, countertops, utilities, and field conditions.
The ranges below are synthesized from commercial cabinet-line documentation and retailer planning guides. They are useful for preliminary layouts, but they are not an industry standard.
Corner Base Cabinet Dimensions at a Glance
Corner-cabinet dimensions must be read by type. The table deliberately separates nominal offerings from wall occupancy and installed space because those measurements are not interchangeable.
| Corner cabinet type | Common nominal offering or product example | Common box-height and depth reference | Wall-leg occupancy or installed-space guidance | What must be verified |
|---|---|---|---|---|
| Lazy Susan or L-shaped corner | Common offerings include 33- and 36-inch models | Often approximately 34.5 inches high and 24 inches deep | A 33- or 36-inch designation commonly corresponds to that distance along each adjoining wall, but the selected drawing must confirm it in this corner-cabinet dimensional guide | Wall-leg definition, box shape, opening, shelf diameter, doors, hinges, and countertop footprint |
| Blind corner | Depending on the cabinet line, offerings may include 33, 36, 39, 42 inches, or larger | Many products are approximately 34.5 inches high and 24 inches deep | Working length can exceed actual box width; one product line lists true widths of 33, 36, and 39 inches while using working-length ranges extending from 36 to 45 inches on the ABCabinetry product page | Actual box, working length, pull distance, side-wall offset, filler, handing, and organizer clearance |
| Diagonal or angle base | One manufacturer identifies 33- and 36-inch offerings | Product-specific, often based on conventional base-cabinet height and depth | Wall-leg occupancy and angled-face location must come from the plan-view drawing; the nominal size alone is insufficient in Superior Cabinets’ corner-type guide | Distance on both walls, face position, side depth, fillers, door swing, and countertop geometry |
| Corner drawer | One manufacturer identifies 36- and 42-inch offerings | Product-specific | Closed footprint is only part of the requirement because the drawers project into the room | Drawer extension, handle collisions, wall-leg occupancy, appliance clearance, and adjacent hardware |
| Corner sink | Examples commonly begin around a 36-inch corner arrangement; some layouts need more | One listed diagonal sink base is 36 inches wide, 24 inches deep, and 34.5 inches high before the countertop in Lanae’s product-line guide | Depending on whether the unit is a face-only or full-box design, space may be reserved on both walls | Sink template, bowl, cabinet opening, supports, plumbing, faucet, disposal, countertop material, and seams |
Planning note: Every size in this chart is preliminary. Before ordering, compare the room plan with the exact specification sheet, plan-view drawing, installation instructions, hardware requirements, and countertop details for the selected product. Confirm the dimensions on site as well.
Why the Size on the Cabinet Label May Not Be Its Footprint
For a simplified straight-run layout, a rectangular base cabinet can be represented by the segment of wall occupied by its box, with fillers and finished panels shown separately. A corner cabinet requires more information because it interacts with two cabinet runs and may contain space hidden behind the return.
The measurements to keep separate
Nominal size is the product name or rounded designation used to identify the cabinet. It may correspond to a wall leg, intended working length, or product family rather than the exact carcass width.
Actual cabinet-box width is the physical width of the carcass. On a blind-corner unit, it may be smaller than the nominal designation or working length.
Wall-leg occupancy is the distance measured from the inside room corner along an adjoining wall. L-shaped and diagonal units generally need a relevant dimension on both walls.
Working length is a manufacturer-defined planning dimension. Depending on the cabinet line, it may incorporate an adjustment range, offset, or intended occupied space. Its definition must be read from the selected drawing.
Face or door width is the width of the visible front or door. It is not necessarily the clear opening, and neither measurement reveals the total storage extending into the corner.
This measurement is especially important when an organizer must pass through the opening.
Total installed or occupied space includes the portions of the assembly that consume the run: the box, documented pull distance or offset, required filler, finished panels, scribe allowance, and operating clearance.
A 36-inch Lazy Susan commonly uses a relevant 36-inch dimension on each wall. It should not be pictured as an ordinary rectangular cabinet with a single 36-inch front. Conversely, a blind cabinet with a 36-inch physical box may require a longer section of wall once its positioning and access requirements are included.
Lanae’s blind-corner products illustrate the distinction. Its nominal 40-inch unit has a 36-inch actual box, a 14 5/16-inch door, a 4- to 6-inch side-wall spacing, and an occupied length of 40 to 42 inches. Its nominal 42-inch unit has a 39-inch box, a 15 3/16-inch door, a 3- to 6-inch spacing, and an occupied length of 42 to 45 inches in the manufacturer’s dimensional examples. The door-width figures are another distinct measurement; they should not be treated as clear-opening widths without further documentation.
Model codes can also be misleading. ABCabinetry lists true box widths of 33, 36, and 39 inches, while the working-length information uses BBC36, BBC39, and BBC42 labels with ranges of 36–39, 39–42, and 42–45 inches, respectively. Because those labels and dimensions do not form a simple one-to-one width schedule, the dimensional drawing is safer than an inference based on the SKU on the product page.
For every cabinet under consideration, prepare a plan-view diagram showing:
- The inside room corner
- Wall A and Wall B
- The physical cabinet box
- The visible face and door
- Any blind extension
- Fillers and finished panels
- The adjacent cabinet on the return
- The occupied length on each wall
- Door, drawer, shelf, and organizer movement
- The reference points used for every dimension
Without defined reference points, two measurements both called “36 inches” may describe different parts of the installation.
Lazy Susan and L-Shaped Corner Cabinet Sizes
Lazy Susan and L-shaped corner bases recur across cabinet lines in 33- and 36-inch sizes. In a common plan-view interpretation:
- A 33-inch model reserves approximately 33 inches from the inside corner along each adjoining wall.
- A 36-inch model reserves approximately 36 inches from the inside corner along each adjoining wall.
RTA Wood Cabinets describes both layouts in those terms and notes that its 33-inch example has a smaller opening than the 36-inch version in its corner-layout guide.
A simplified plan might look like this:
Wall A
Inside corner ├──────── 36" reserved ────────┐
              │                              │
              │       L-shaped cabinet       │
              │                              │
              └──────── 36" reserved ────────┤ Wall B
This sketch communicates wall-leg occupancy only. It does not establish the exact panel shape, face-frame position, toe kick, countertop cut, door location, or attachment points.
Many Lazy Susan bases are published at approximately 34.5 inches high and 24 inches deep. They generally contain rotating shelves and may use bifold doors, independently hinged fronts, or another door arrangement. The exterior footprint alone does not reveal:
- Clear door-opening width and height
- Shelf diameter and shape
- Clearance between the shelf and cabinet walls
- Hinge projection
- Face-frame interference
- Usable space above each shelf
- Whether stored items can pass through the opening
As a product-line example, Lanae lists 33- and 36-inch Lazy Susan cabinets with two 26-inch-diameter rotating shelves. That shelf diameter belongs to those products; it is not a standard that can be transferred to every cabinet of the same nominal size.
Lazy Susan verification box
Before ordering, confirm:
- Wall-leg definition: Does the advertised width apply to each wall?
- Box and countertop shape: Does the countertop follow the cabinet footprint exactly, or does it project beyond it?
- Shelf dimensions: What are the diameter, shape, edge clearance, and vertical spacing?
- Door configuration: Are the doors bifold, independently hinged, or arranged another way?
- Hinge movement: Where do the doors and hinges project when fully open?
- Clear opening: What unobstructed width and height remain after the face frame and hardware are installed?
- Adjacent clearance: Will the doors clear the next drawer, handle, appliance, filler, or finished panel?
- Assembly access: Can the cabinet be assembled or maneuvered into the room?
A product listing may also use an unexpected measurement convention. Home Depot lists the Hampton Bay KBLSN36-UF at 36 inches wide, 16.5 inches deep, and 34.5 inches high. The listing does not explain the reference points for the unusual depth, so it should not be treated as a standard corner-base depth without the technical drawing on the KBLSN36-UF listing.
Blind-Corner Cabinet Dimensions and Required Wall Space
A blind-corner cabinet extends into the concealed space behind the adjoining cabinet run. Its interior is accessed from one side rather than through a centered corner opening.
Blind-corner sizes are highly dependent on the cabinet line. Published offerings include combinations of 33, 36, 39, 42, 45, and 48 inches. These figures may refer to different measurements, so they should not be combined into a universal size schedule.
Many blind-corner products follow the common base-cabinet references of approximately 34.5 inches high and 24 inches deep. Those dimensions still do not answer the central layout question: how much wall length will the installation consume?
Why the installed footprint grows
The occupied space may exceed the physical box because of:
- A required pull-forward distance from the corner
- A minimum side-wall offset
- A filler between the blind cabinet and return cabinet
- A finished end panel or applied skin
- Scribe material for an uneven wall
- Door, drawer, hinge, or handle clearance
- Organizer movement and access
- The position of the adjacent cabinet face
One RTA Wholesalers blind-corner product is offered in 36- and 42-inch widths, both listed at 24 inches deep and 34.5 inches high. The seller states that the 36-inch variant requires 39 inches of installation space, demonstrating why exactly 36 available inches would be insufficient for that model on the identified product page.
The Lanae example discussed earlier uses a different relationship: its 36-inch physical box is associated with a nominal 40-inch cabinet and occupies 40 to 42 inches after the specified side-wall spacing. These examples cannot be converted into a general allowance because they belong to different products.
Offsets and fillers are not universal
Published guidance varies by product and source. Superior Cabinets recommends positioning its typical blind-corner installation 1 to 3 inches forward from the wall corner. The same source identifies common blind-corner offerings of 39, 42, 45, and 48 inches, while its other corner categories use different size schedules in its cabinet-type guide.
Other product lines call for larger side-wall spacing, and some layout examples use a 3-inch filler on the return. These measurements describe different components:
- A pull distance changes the cabinet’s position relative to the corner.
- A side-wall offset is the specified separation from a reference wall.
- A filler separates cabinet faces or absorbs an unusable gap.
- A finished panel covers an exposed side.
- A scribe allowance provides material for fitting an uneven wall.
- Operating clearance provides room for moving doors, hardware, or organizers.
Do not assume that a 3-inch filler can replace a 3-inch pull distance, or that either can replace a product-specific offset.
Use one of these calculation paths, depending on the selected documentation:
Starting with the box: Total occupied run = actual box width + documented offsets or pull distance + required filler or panels + separately specified operating clearance
Starting with a published working or occupied length: Total occupied run = manufacturer-defined working or occupied length + only those fillers, panels, or clearances that the drawing explicitly excludes
Do not add an offset twice. If the working length already includes the cabinet’s pull distance or adjustment range, adding it again will overstate the required wall space.
Left, right, and reversible blind corners
Blind-corner cabinets may be left-handed, right-handed, or reversible.
Do not determine handing only by standing in the room and describing the corner as left or right. Catalogs may illustrate products from different viewpoints. Instead:
- Draw the cabinet from above.
- Mark the accessible door.
- Mark the hidden extension.
- Mark the return run.
- Compare the sketch with the manufacturer’s handed diagram.
- Confirm whether the box can be reversed during assembly.
- Verify the handing of any internal organizer separately.
Diagonal, Corner-Drawer, and Corner-Sink Configurations
Not every corner base is an L-shaped Lazy Susan or blind cabinet. Diagonal fronts, corner drawers, sink faces, and full-box sink cabinets each create different spatial relationships.
Diagonal or angle bases
A diagonal or angle base has an angled front spanning the corner. It is not another name for an L-shaped Lazy Susan.
One manufacturer identifies 33- and 36-inch angle bases as common offerings. Another commercial guide describes diagonal and swing-out or pull-out configurations as typically around 36 by 36 inches, while emphasizing that final dimensions depend on the design and hardware in George Cabinetry’s planning guide.
For an angle cabinet, verify:
- Occupancy along both walls
- Position and width of the angled face
- Cabinet depth at the sides and center
- Door and drawer arrangement
- Required fillers
- Toe-kick transitions
- Countertop shape and projection
- Interior shelf or organizer dimensions
Corner-drawer cabinets
Corner-drawer units arrange shaped drawers to open from the corner. Superior Cabinets lists 36- and 42-inch corner-drawer products, but those sizes represent one manufacturer’s offerings rather than an industry-wide range.
The open footprint matters as much as the closed cabinet. Check every drawer at full extension, including its front and handle, against:
- Perpendicular drawers and doors
- Range or dishwasher handles
- Refrigerator doors
- Island edges
- Finished panels
- Intended circulation space
Two cabinets can fit in plan while their handles collide when opened.
Corner-sink cabinets
A corner sink can use at least two substantially different cabinet arrangements:
- A corner-sink face installed between cabinets on the adjoining runs
- A full-box corner-sink cabinet occupying the corner itself
In RTA Wood Cabinets’ face-only example, the adjoining cabinets begin 36 inches from the corner, creating a 45-degree front. The guide also describes larger face arrangements requiring 42 inches along each wall, full-box versions occupying 36 inches along each wall, and a dead-corner example in which a 3-inch filler follows a 24-inch cabinet depth so each run starts 27 inches from the corner in its illustrated layout examples.
A listed 36-inch corner-sink cabinet does not establish which sink will fit. The final review must include:
- The exact sink template
- Overall bowl width, length, and depth
- Rim, flange, or apron geometry
- Cabinet opening and face-frame restrictions
- Clips, rails, cradle, or other supports
- Faucet body and handle movement
- Supply, drain, vent, and trap positions
- Garbage-disposal dimensions
- Countertop material and support requirements
- Corner treatment and seam strategy
An intentionally unused corner
A dead corner leaves the inaccessible corner unused and begins both cabinet runs away from it. It can simplify some layouts, but its dimensions still need to be drawn explicitly.
No corner type is universally superior in storage, accessibility, price, or ergonomics. The appropriate choice depends on the selected product, room, hardware, intended storage, and adjoining layout.
How to Measure a Kitchen Corner
Measuring a corner should produce a complete room plan, not one number beside the wall intersection. Both walls, the corner angle, nearby obstacles, and neighboring cabinets affect the installation.
1. Establish fixed reference points
Choose reference points that will remain after demolition, such as finished wall intersections, permanent openings, or structural edges. Avoid basing the whole plan on temporary trim or existing cabinets that may not be level or plumb.
Measure the complete usable runs from those points. Do not measure only the open patch around the corner.
2. Measure both adjoining walls independently
Record Wall A and Wall B separately in inches. Do not assume they are equal.
Measure horizontally near the intended countertop or base-cabinet level, then repeat critical measurements near the floor. Ultimate Millwork recommends recording wall lengths at approximately 36 inches above the floor and mapping openings, utilities, vents, appliances, and other obstructions in its measurement instructions.
Floor-level measurements can reveal baseboards, pipes, wall bows, and framing irregularities that are not obvious higher on the wall.
3. Record the corner angle
Do not assume the corner is exactly square. Check it with an angle finder, framing square, or appropriate diagonal-measurement method.
Record the field condition rather than correcting it only on paper.
4. Check walls and floors
Look for:
- Bowed or leaning walls
- Rounded drywall or plaster corners
- Changes in wall thickness
- Uneven or sloped floors
- Flooring that will be added or removed
- High spots below cabinet sides or feet
These conditions may require shims, leveling, field adjustment, or additional scribe material. They can also alter the finished countertop height and cabinet-face alignment.
5. Separate box dimensions from finished dimensions
Record the planned:
- Cabinet-box height and depth
- Toe-kick position
- Countertop thickness
- Finished work-surface height
- Front and side countertop projection
- Backsplash thickness where relevant
A cabinet-box dimension is not a finished countertop dimension. The countertop may extend beyond the box or follow a different corner shape.
6. Map doors, windows, and trim
Show every opening, including casing, sill projection, and room-door swing. Record whether existing trim will remain or be replaced.
A cabinet box may clear the opening while its countertop, handle, door, or drawer strikes the trim.
7. Locate appliances
Draw the actual appliance envelope rather than only its nominal category width. Include:
- Refrigerator body, doors, and handles
- Range or cooktop
- Dishwasher
- Undercounter refrigeration
- Projecting controls
- Appliance panels and side fillers
Use the selected appliance documentation whenever possible. Test the doors and drawers in motion, not just in the closed position.
8. Locate utilities and obstructions
Mark the horizontal position and height of:
- Water supplies
- Drain and vent pipes
- Gas lines
- Outlets and junction boxes
- Floor and wall vents
- Heaters and radiators
- Ductwork and cleanouts
- Posts, beams, and chases
9. Map neighboring cabinets
Write the intended width of every cabinet on both runs. Include fillers, skins, exposed panels, and appliance openings.
Then test the movement of:
- Doors
- Drawers
- Bifold fronts
- Handles and knobs
- Rotating shelves
- Pull-out organizers
- Appliance doors
Hardware at the return deserves particular attention. The boxes may fit while the handles collide.
10. Create a labeled plan view
The final sketch should show:
- Both wall dimensions
- The measured corner angle
- Openings and trim
- Utilities and structural obstacles
- Appliance edges
- Cabinet boxes and faces
- Fillers and finished panels
- Countertop edges
- Door and drawer movement
Keep field measurements and proposed cabinetry on separate drawing layers or separate sketches. This makes it easier to identify whether a number came from the room or a product document.
These measurements support product selection. They do not replace the selected manufacturer’s instructions, dimensional drawings, or an on-site fit check before the order is released.
Fillers, Doors, Drawers, and Organizer Clearances
A cabinet can fit within the wall dimensions and still fail operationally. The usual problem is checking the closed footprint without testing everything that moves.
Why fillers matter
A filler is a non-storage strip used to create separation or absorb an irregular gap. Beside a blind-corner cabinet, it may move the return cabinet far enough away for doors, drawers, and handles to operate.
RTA Cabinets House describes corner fillers as usually 3 inches or wider, depending on the layout, and advises checking the cabinet’s pull distance, handing, neighboring cabinets, appliances, and door swing rather than selecting by width alone in its corner-planning guide. That figure is an example, not a universal requirement.
A filler is not necessarily the same as:
- Pull-forward distance
- Side-wall offset
- Finished end panel
- Decorative skin
- Scribe material
- General installation tolerance
- Organizer clearance
The components may occupy different positions in the layout, and a published working length may already include one or more of them.
Test the complete motion envelope
For each moving component, sketch or model the area it occupies from closed to fully open.
Bifold doors: Check both leaves, the center hinge, and the folded position against adjoining fronts and hardware.
Blind-corner doors: Check the hinge side, handle, open-door position, and access required by the organizer.
Drawers: Check the drawer front and handle through full extension. Determine whether a perpendicular drawer must be usable at the same time.
Rotating shelves: Confirm that shelf edges, stored items, and door hardware remain clear through a complete rotation.
Pull-out and swing-out organizers: Use the organizer manufacturer’s required opening, cabinet dimensions, handing, and motion diagram.
There is no universal hinge angle or organizer clearance that applies to every cabinet. Use product-specific values only for the exact cabinet and hardware package.
Handing changes access
A cabinet may physically fit in either orientation while only one orientation places the opening on the usable side. Confirm:
- Which side is accessible
- Which direction the door hinges
- Whether the box is reversible
- Whether the organizer is reversible
- Whether an appliance blocks the opening
- Whether a person can stand in front of the access point
Include the complete assembly
The final fit review should include:
- Handles and knobs
- Applied doors and finished panels
- Countertop overhang
- Waterfall panels
- Trim and molding
- Appliance handles and doors
- Exposed skins
- Scribe strips
- Wall and floor irregularities
The controlling footprint is the complete installed assembly, not the unfinished cabinet carcass.
The Pre-Order Corner Cabinet Checklist
Review this checklist with the field plan, product specification sheet, dimensional drawing, installation instructions, hardware documentation, and countertop information open together.
Cabinet type
- [ ] Lazy Susan or L-shaped corner
- [ ] Blind-corner cabinet
- [ ] Diagonal or angle base
- [ ] Corner-drawer cabinet
- [ ] Corner-sink face or full-box sink cabinet
- [ ] Intentionally unused corner
Choose the type before interpreting the nominal size.
Dimension definitions
- [ ] Nominal product size
- [ ] Actual cabinet-box width
- [ ] Box height and depth
- [ ] Occupancy along Wall A
- [ ] Occupancy along Wall B
- [ ] Manufacturer-defined working length
- [ ] Face or door width
- [ ] Clear opening
- [ ] Total installed footprint
Mark the reference points for every dimension. Request clarification when the drawing does not define its working length or wall-leg measurements.
Installation allowances
- [ ] Required filler
- [ ] Pull-forward distance
- [ ] Side-wall offset
- [ ] Finished panels or skins
- [ ] Scribe allowance
- [ ] Installation tolerance
- [ ] Organizer clearance
Confirm whether the working or occupied length already includes any of these allowances.
Handing and movement
- [ ] Left-hand, right-hand, or reversible configuration
- [ ] Accessible door faces the intended side
- [ ] Doors and hinges clear adjacent fronts
- [ ] Drawers extend without collision
- [ ] Handles clear at the return
- [ ] Rotating shelves complete their movement
- [ ] Pull-out organizers clear the opening
- [ ] Appliance doors remain operable
Room conditions
- [ ] Both wall runs measured independently
- [ ] Corner angle checked
- [ ] Walls checked for bow and lean
- [ ] Floor checked for level
- [ ] Openings and trim recorded
- [ ] Plumbing, electrical, vents, and heating recorded
- [ ] Structural obstacles marked
- [ ] Appliance dimensions and movement shown
- [ ] Neighboring cabinets and hardware mapped
Corner-sink requirements
- [ ] Exact sink template obtained
- [ ] Bowl dimensions and depth checked
- [ ] Cabinet opening verified
- [ ] Face-frame restrictions checked
- [ ] Support method confirmed
- [ ] Faucet movement checked
- [ ] Water, drain, vent, and trap locations confirmed
- [ ] Disposal dimensions checked
- [ ] Countertop requirements reviewed
- [ ] Seam and corner treatment approved
Countertop requirements
- [ ] Cabinet-box dimensions separated from countertop dimensions
- [ ] Countertop thickness specified
- [ ] Finished height calculated
- [ ] Front and side projections shown
- [ ] Corner shape defined
- [ ] Overhangs shown
- [ ] Sink or cooktop cutout coordinated
- [ ] Seam locations reviewed
Do not release the order based solely on a category chart, model name, or retailer title. Require documentation for the exact cabinet size, finish, construction style, door configuration, and hardware package.
For the dimensional conventions used elsewhere in the room, Cabinet Data’s broader kitchen cabinet size reference provides a useful internal planning overview. Corner-specific dimensions must still come from the selected third-party product documentation.
Frequently Asked Questions
What is the standard size of a corner base cabinet?
There is no single standard size for every corner base cabinet. Many products use the common base-cabinet references of approximately 34.5 inches high before the countertop and 24 inches deep, while Lazy Susan cabinets commonly appear in 33- and 36-inch sizes. Blind, diagonal, drawer, and sink configurations use different size schedules as summarized in George Cabinetry’s corner-base guide.
Treat those figures as preliminary conventions. The selected product’s box dimensions, wall-leg occupancy, working length, and installation requirements determine the space needed.
How much wall space does a 36-inch Lazy Susan cabinet use?
A typical 36-inch L-shaped Lazy Susan reserves approximately 36 inches from the inside corner along each adjoining wall. It does not usually describe a simple rectangular cabinet with one 36-inch-wide front as reflected in this guide’s typical “each side” dimensions.
Confirm that interpretation on the selected model’s plan-view drawing, including the cabinet face, opening, countertop footprint, and required clearances.
Does a 36-inch blind-corner cabinet need exactly 36 inches of installation space?
Not necessarily. The box may need additional room for its pull distance, side-wall offset, filler, panel, or operating clearance.
One identified 36-inch blind-corner product requires 39 inches of installation space, so exactly 36 available inches would not accommodate that model according to the retailer’s product specifications. Other products use different relationships between box width and occupied length.
How much filler should be placed beside a blind-corner cabinet?
There is no universal filler width. Some layouts use a 3-inch filler as a starting example, while other cabinets require a different filler, pull distance, or side-wall offset.
Use the selected installation drawing. Check the cabinet construction, door overlay, hinges, handles, adjacent cabinet, and organizer, and confirm whether the published working length already includes the required adjustment.
How do I determine whether I need a left- or right-hand blind-corner cabinet?
Draw a plan view and mark the accessible door, hidden extension, and returning cabinet run. Compare that drawing with the manufacturer’s handed illustration.
Do not rely only on whether the corner appears to be on your left or right when standing in the room. Some boxes are reversible, but their doors, drawers, or internal organizers may still require a specific orientation.
The key decision is the corner-cabinet type, not its nominal size. Use common ranges only to build the preliminary layout, calculate the effect on both cabinet runs, and then verify the actual box, occupied footprint, fillers, handing, operating clearances, countertop, utilities, and field conditions against the exact product documentation before ordering.